Gen 1 EGR Delete &
Cooler Delete.
EGR block-off, primary and auxiliary EGR cooler removal, and coolant line re-route for the 2009–2012 North American 3.0 TDI Gen 1. Cabin heat is retained through the billet coolant bypass.
CATA · 2009–2012
Before you start
Three things to do before you pick up a wrench.
This manual covers the full Gen 1 EGR delete: blocking the EGR at the intake plenum and the turbo, pulling the main EGR cooler and its pipework, removing the auxiliary change-over cooler and electric coolant pump, and re-routing the coolant so the heater core keeps working.
Take pictures of your engine first.
Shoot every area before you start so you know where each component, hose and clip you remove is supposed to sit.
Get the flash file ready.
Read your ECM software image and send it to your tuner with the EGR (and any other components you are deleting) before you start. That way the file is ready when the mechanical work is done.
⚠ 03 · Off-road use only
You are doing this work at your own risk. This kit and procedure are intended for off-road use or for countries without emissions laws.
⚠ Note · tune required
An EGR-off tune is required with this kit, otherwise you will get fault codes. An EGR-off tune can be done with the rest of the exhaust treatment left intact.
Document contents
What's in this manual.
5 numbered sections, 28 pages. Do them in order: the block-off plates go on before the coolers come out.
00 · Front matter — kit contents · tools · torque reference · system overview · page 6
Kit A00016 · what's in the box
Check the kit before you start.
| Item | Ref | Qty |
|---|---|---|
| Billet aluminum coolant bypass block | 6061-T6 | 1× |
| Mounting bracket | 1× | |
| Intake manifold EGR block-off plate (tapped) | 1× | |
| Turbo EGR block-off plate | 1× |
| Item | Ref | Qty |
|---|---|---|
| OEM VW EGR block-off gasket, intake and turbo | 2× | |
| Replacement coolant pipe O-rings | N90809102 | 2× |
| Vacuum cap | 1× | |
| Primary cooler delete barb | 1× | |
| Mounting hardware and replacement fasteners for bracket, block-off plates and coolant components | — |
Tools & software
- VCDS scan tool
- EGR-delete tune flash file
- Flash tool (Flashzilla 3, Powergate 3 or similar)
- Long T30 bit, deep 6-point 13 mm, wobble extension
- Micro-ratchet for tight access
- Torque wrench (Nm)
Also have on hand
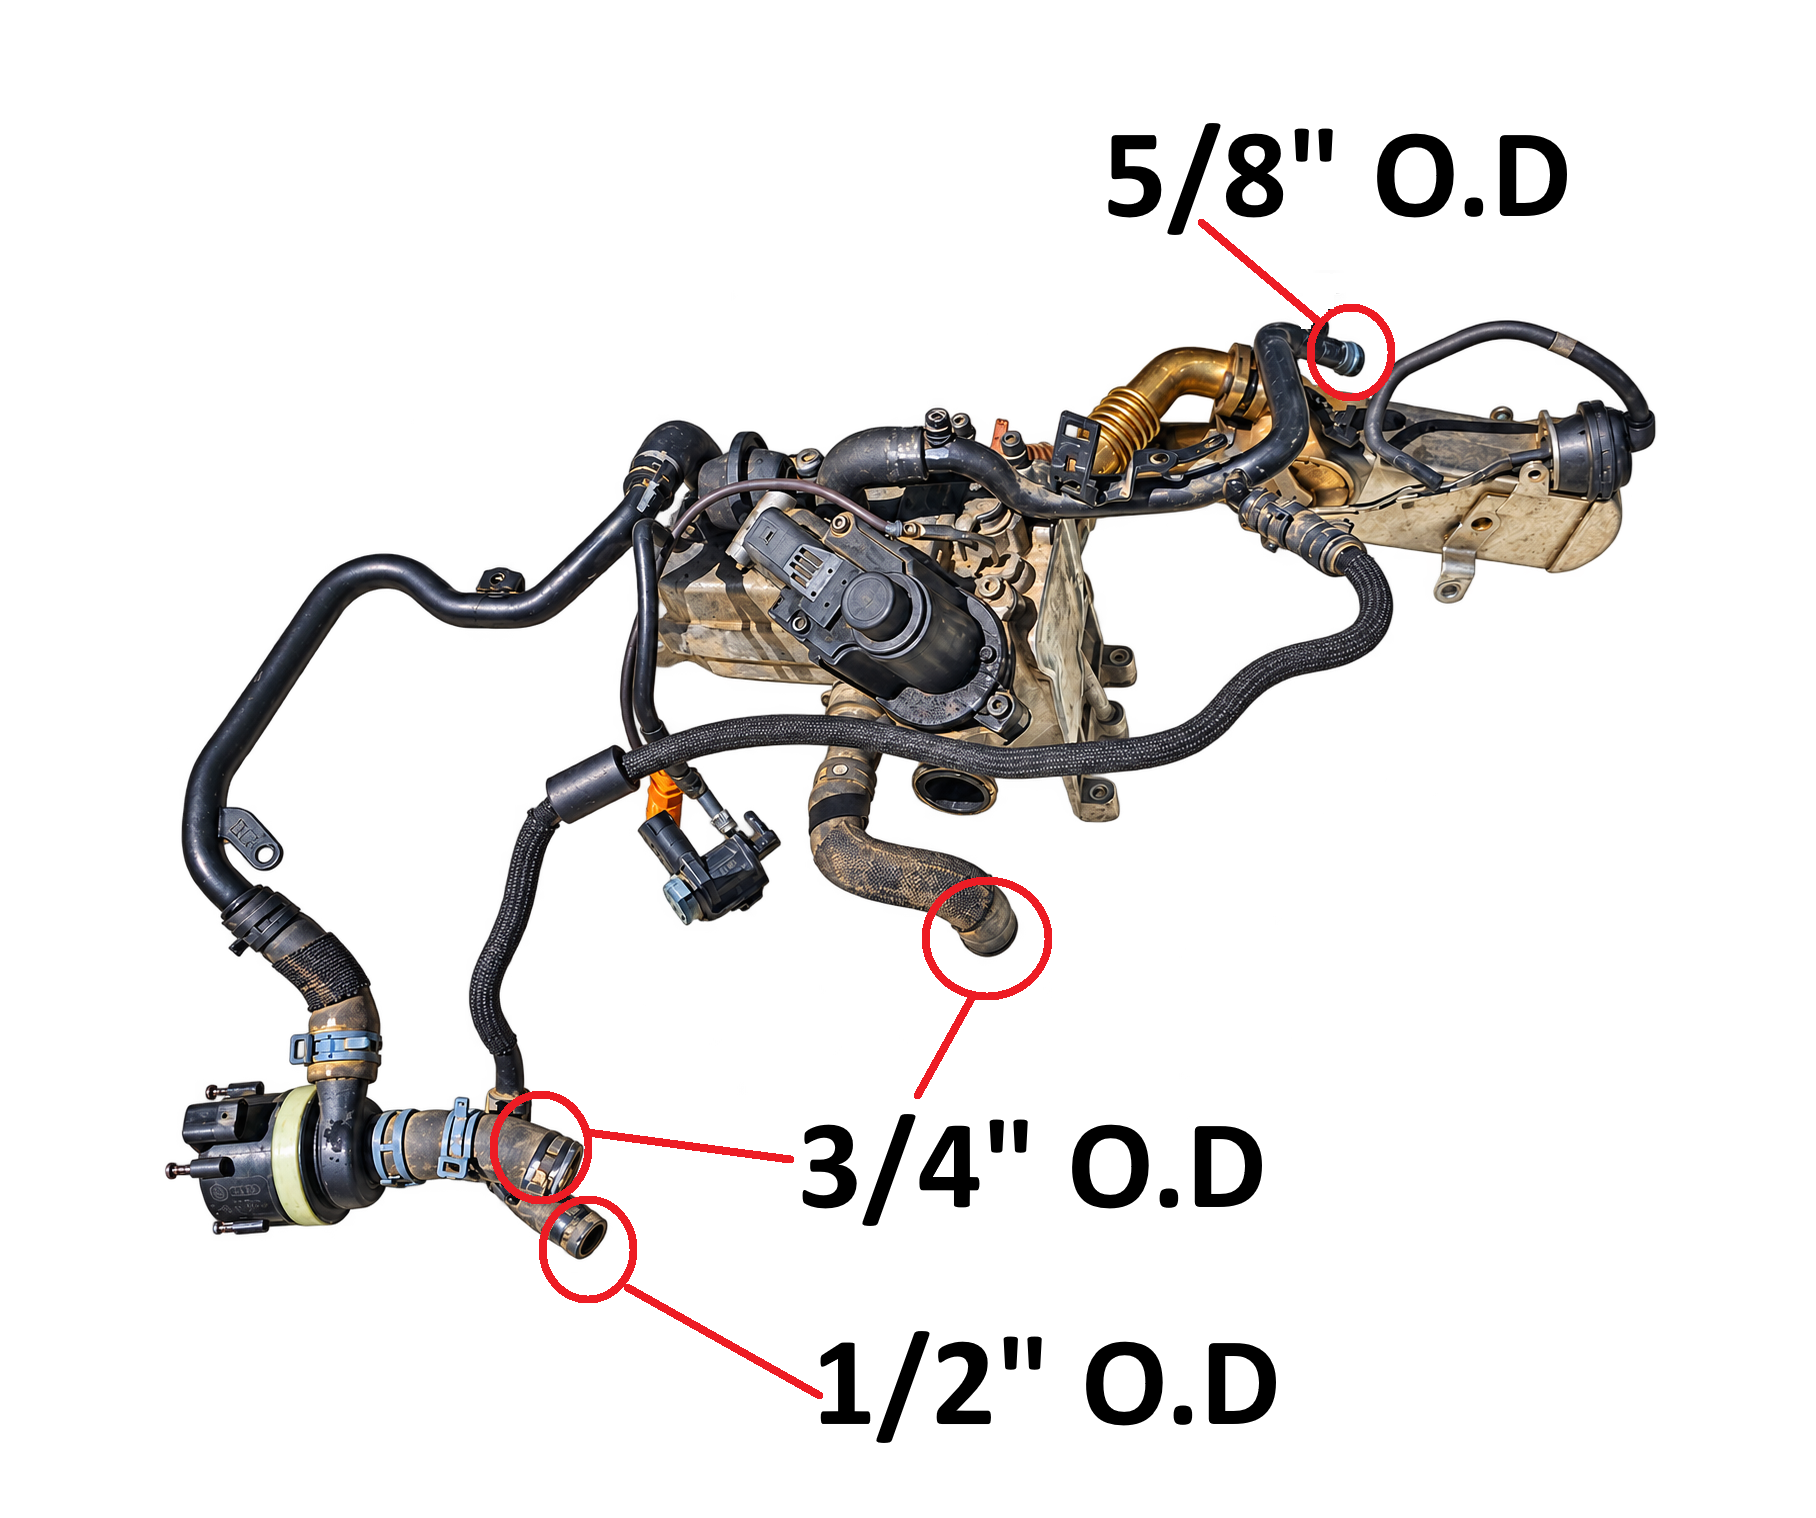
- Silicone caps: 1× ½″, 1× ⅝″, 2× ¾″
- 1× 5/16″ 90° silicone elbow
- Hose clamps, ½″ to 1¼″
- Penetrating fluid (acetone + ATF works)
- Copper anti-seize · silicone fusing tape
- Coolant for refill
⚠ Recommended spares · if keeping the primary cat
3× turbo pinch bolts N91130801 and 1× turbo gasket 4D0253115A. About five dollars from the dealer, and the old bolts rarely survive removal after years of heat cycles.
 A00-00000
Torque reference
Fastener values.
Keep this page open during the block-off and reassembly steps.
Intake side
| Location | Note | Value |
|---|---|---|
| Intake block-off plate to plenum — 16 mm bolts, T30 | Plate is tapped | 9 Nm6.5 ft-lb |
Turbo side
| Location | Note | Value |
|---|---|---|
| Turbo block-off plate to pedestal — 16 mm bolts | Anti-seize | 9 Nm6.5 ft-lb |
| Turbo pinch bolts (cat to turbo) | Copper anti-seize | 23 Nm17 ft-lb |
Turbo side
| Location | Note | Value |
|---|---|---|
| Primary cat to cat support bracket | If reinstalling | 23 Nm17 ft-lb |
Gen 1 EGR system overview
How the CATA EGR system flows.
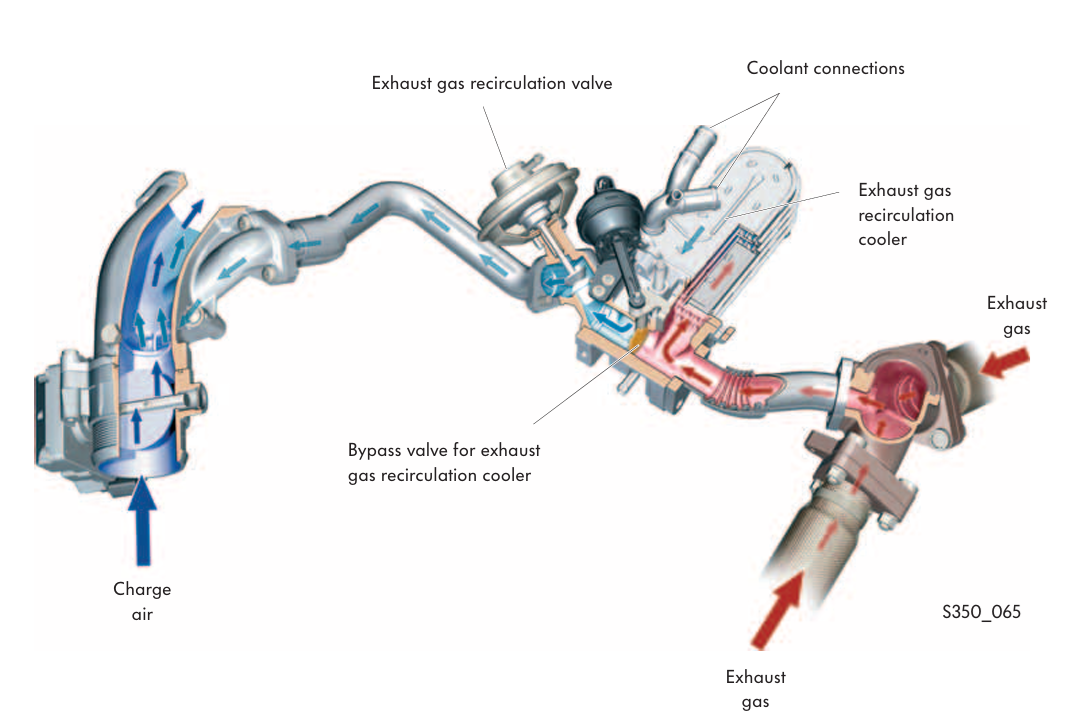
Exhaust gas leaves the turbo through a 2-bolt flange into the upstream (auxiliary change-over) cooler. The upstream cooler carries the main EGR valve, which controls flow to the downstream cooler where most of the cooling happens. From there the EGR metering valve meters gas through the intake EGR pipe into the intake plenum.
Turbo → Upstream EGR pipe → Upstream cooler → Mid pipe → Downstream cooler → Intake EGR pipe → Intake plenum
⌬ What this kit does
The larger blockoff plate seals the turbo port, the smaller tapped blockoff plate seals the intake plenum. The auxiliary cooler then come out, and the billet bypass block keeps coolant flowing to the heater core in place of the aux cooler.
Remove the two T30 bolts holding the intake EGR pipe to the intake plenum.
Follow the pipe under the intake manifold to the V-band connection on the cooler. The V-band T30 is reachable from the top of the engine once you move some lines aside.
Loosen the V-band T30 with a long bit until the pipe comes free, then wiggle it out the bottom. Catch the intake gasket and the V-band clamp so they don't fall into the engine.
Clean the intake manifold mating surface with brake cleaner or alcohol. No soot or debris left on the face.
Fit the darker coated gasket and the smaller tapped plate with the 16 mm bolts using a 5mm hex. Torque to 9 Nm.
Leave the V-band connection at the cooler open. Nothing else is needed on that side.
⌬ Tip · gasket clip
The gasket clips onto the bolts. Start one bolt, press the gasket onto it until it clips into the triangular bolt hole, then do the other. Push the plate onto the assembly and thread the bolts in.
On Gen 1 the EGR port sits on the cast exhaust union (turbo pedestal), not on the turbo exhaust manifold as on Gen 2. This is a lot easier if you are already deleting the primary cat.
⚠ Soak the bolts first
Soak the pinch bolts and the EGR pipe bolts nearest the turbo with penetrating fluid for several hours before you start. Dry bolts here strip, and a stripped T30 means a bolt extractor.
Access: heat shield and primary cat
Remove the turbo heat shield, held by three T30 bolts. The third bolt is hidden; use the diagram to find it.
Deleting the cat: remove the entire primary cat and leave it off for clearance. Keeping it: continue with step 03 so it can slide off the turbo studs.
From under the car, look up between the firewall and the engine and remove the bolt holding the cat to the cat support bracket. Reinstall at 23 Nm.
⚠ Note · aftermarket downpipes
Rawtek and Buzzken downpipes have no provision for the cat support bolt. Skip it when reinstalling one of those.
Turbo block-off · steps 04–07
Pinch bolts, EGR pipes, plate.
Remove the copper turbo pinch bolts (13 mm) with a deep 6-point socket and impact. The bottom one needs an extension and a wobble adapter. Replace them with new bolts if you can.
On reinstall, coat the pinch bolts with copper anti-seize and torque to 23 Nm.
Remove the mid pipe first (it sits on top), then the upstream EGR pipe from the turbo pedestal. Use a long T30 and impact.
Install the larger plate and metal gasket with retaining clip on the turbo pedestal using the 16 mm bolts. Apply anti-seize and torque to 9 Nm.
⌬ Keep the pipes
Don't throw away the pipes you remove. They are expensive to replace and resell well.
Use the factory service manual for fastener locations. With both block-off plates installed, remove the following:
- Main (downstream) EGR cooler and the pipework from it to the intake plenum.
- Exhaust components between the turbo and the upstream auxiliary change-over EGR cooler.
- Upstream auxiliary change-over EGR cooler — this is replaced by the billet bypass block in Part 04.
- EGR pilot solenoids and their vacuum lines.
- EGR coolant lines and the electric EGR coolant pump.
⌬ Optional · while it's apart
This is a good time to clean carbon out of the intake. Carbon-off spray or a soak in diesel with drill brushes works well. A swirl flap delete can be done now too, but it needs to be included in your tune.
Primary cooler delete barb
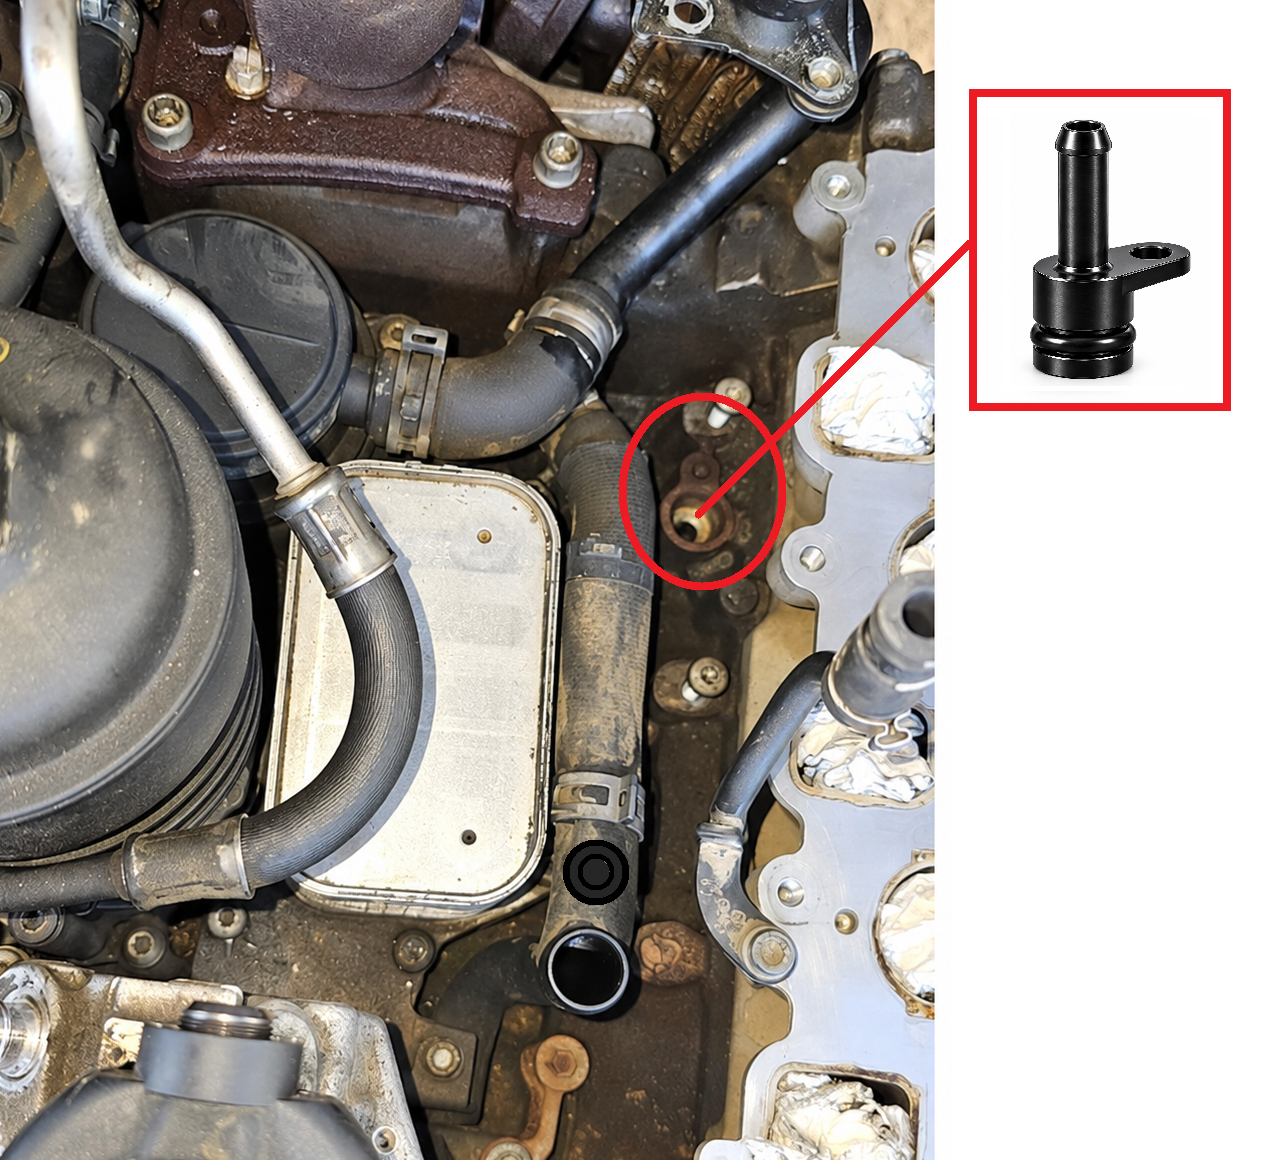
Install the primary cooler delete barb and its O-ring in the block where the main EGR cooler stem used to fit.
Remove the small hose from the tee and run it to the new barb with the 5/16″ 90° silicone elbow. Clamp both ends.
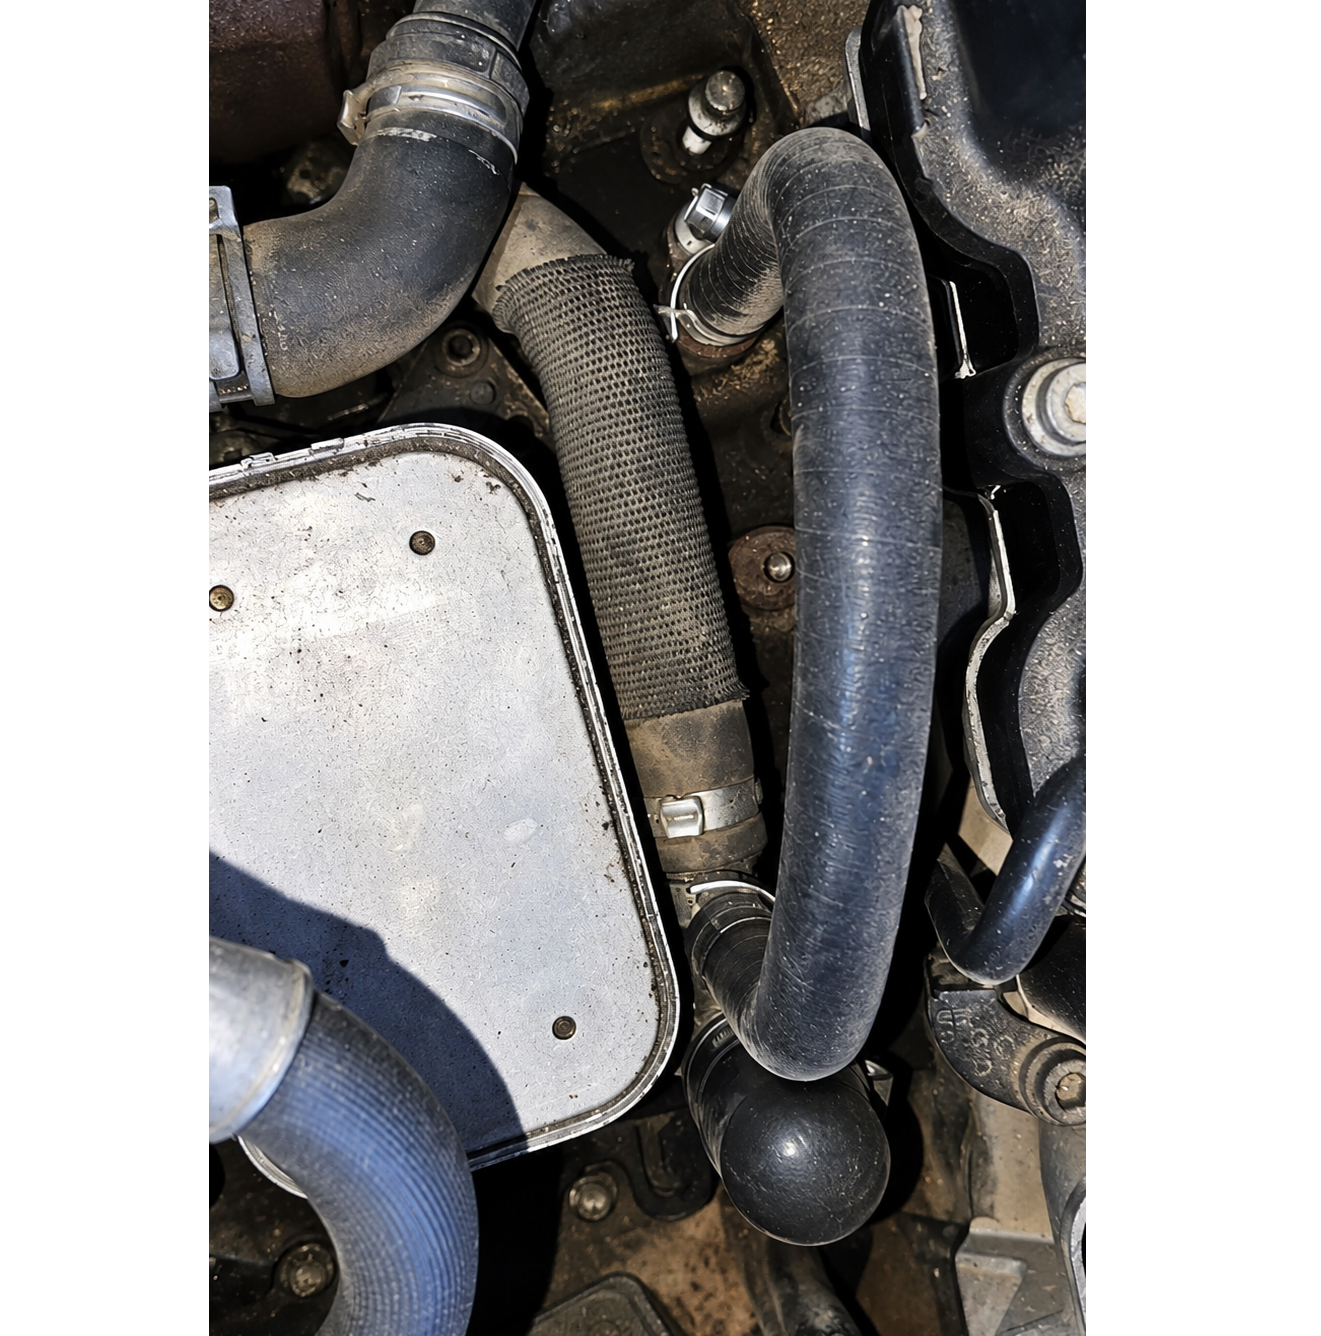
Cap the coolant port next to the barb with a ¾″ silicone cap and clamp it.
Coolant re-route · steps 04–07
Billet bypass block.
The bypass block takes the place of the auxiliary change-over cooler and connects to the factory coolant pipes the same way the OEM cooler did. Internal passages link the ports, so there are no external fittings.
⚠ Never cap off the aux cooler ports
Blocking off the aux cooler without the bypass dead-ends the coolant passage on the RH side of the engine, including the upper temperature sensor tee, and you will have no cabin heat.
Fit the new coolant pipe O-rings N90809102 to the factory coolant pipes. Lightly wet them with coolant.
Push the bypass block onto the factory coolant pipes in the aux cooler's position until both pipes are fully seated.
Secure the block with the supplied mounting bracket and hardware.
Check that the pipes are not under side-load and the O-rings are not pinched.
Coolant re-route · steps 08–10
Pump ports, last coolant port, vacuum.
With the electric EGR coolant pump removed, block off its ports with a ¾″ and a ½″ silicone cap. Clamp both.
Block off the remaining open coolant port (circled) with a ⅝″ silicone cap and clamp it.
Cap the open vacuum line left from the EGR pilot solenoids with the supplied vacuum cap.
Before and after
- Seal the electrical connectors you no longer need with silicone fusing tape.
- Reinstall everything removed for access: cat or downpipe, heat shield, lines moved aside.
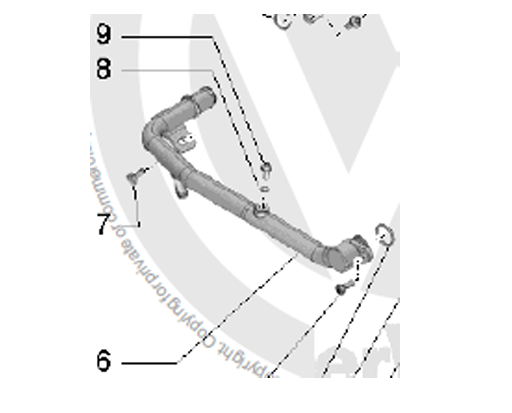
- Fill with coolant. While running to purge, open some of the small lines (the original bleed ports) and the front coolant pipe bleeder (item 9) to let air out.
- Or draw coolant through the small reservoir hose left of the radiator, or pressurise from the reservoir cap with a pressure tester.14 psi
- Flash the EGR-off tune and clear codes with VCDS.
- Bring the engine to temperature and check every cap, clamp and plate for coolant and exhaust leaks. Confirm cabin heat.
Final checklist
- Intake plate at 9 NmIntake
- Turbo plate at 9 Nm, anti-seizeTurbo
- Pinch bolts at 23 Nm, copper anti-seizeTurbo
- Bypass block seated, bracket tightCoolant
- Delete barb + 5/16″ elbow clampedCoolant
- All silicone caps clampedCoolant
- Vacuum line cappedVacuum
- Tune flashed, codes clearedECM
Appendix · workshop notes
Your own observations.
Mileage, date, tune version, parts numbers, things you'd do differently next time.
End of document
A cooler for the cooler. Not anymore.
If you found an error, a clearer way to phrase a step, or a value that doesn't match your engine, let us know. We revise these manuals when the workshop tells us to.